Serials Checkin Cards
Creating Checkin Cards
Creating a checkin card is usually only done once for each magazine, when you first start using Serials or there is a subscription to a new magazine. Boxes are added and deleted as necessary on the one card. The only exception to this is for weekly magazines where MORE practice is to have each year on a separate card; this is easily accomplished by archiving the card that is filled, as in that process a new card for the next year will be created. See more about archiving cards here.
Select matching bib record
Change function to Serials Checkin. Then search for the bib record for the magazine you want to attach a checkin card to. The best way to do this is to change the dropdown box for the way you are searching to MAGAZINES. This will look only in the magazine index so all books, movies, etc that may start with the same title will be filtered out. If there is only one match, the bib record will open. If there is more than one match you will see a browse display:
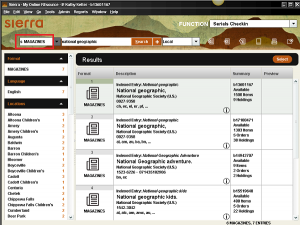
You can hover over the i to get more information. Select the record you want by double-clicking on it to open it, or highlight it and click Select.
Attach New Checkin
On the summary screen, make sure the View says Checkin. If it does not, click the down arrow and select it. If other libraries have checkin cards attached to this bib you will see them listed here. Click Attach New Checkin.
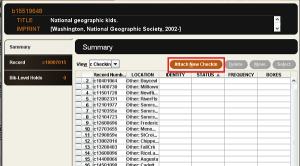
Your checkin template will open. Fill in the fields as they are prompted. Remember to use your macros as appropriate. When you click Next on the last prompt, the Create Card window will open.
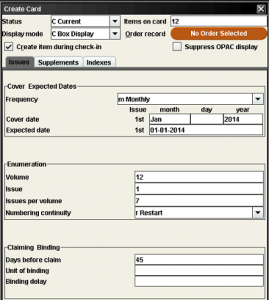
For Items on card, enter the number of issues you want on this card. The maximum number allowed is 84. Recommended numbers are:Weeklies = 52; Monthlies = 60; Bi-monthlies = 36.
For any other publication frequency listed, enter the number for 5 years of issues. If the publication frequency is NOT listed, enter the number of one year of issues.
Check the box in front of Create item during check-in. This will automatically start the item template when you checkin an issue.
Under Cover Expected Dates, for Frequency, click the down arrow and select the frequency for the magazine. If the frequency is NOT listed, select Monthly.
For Cover date, enter the date listed on the first magazine issue you have. Months are entered as the first three letters, day is two numbers, year is four numbers.
Click in the box for Expected date and the date will change to what is in the Cover date, or if no day is present, the first day of the month entered.
Under Enumeration, enter the Volume and Issue number found in the magazine issue you are working with (the issue this card will start with). These can usually be found on the masthead in the front of the magazine or in small print in the back of the magazine with other subscription information. Occasionally it is on the cover. Enter the issues per volume (generally found with the subscription information). Numbering continuity refers to the issue numbers. Restart means the issue numbers start over with 1 with each new volume; this is most common. Continue means that the issue numbers continue over the volumes, so you would see Volume 13, number 143. Very rarely you will find an issue number with no volume. In this case, leave the volume number blank and just fill in the issue number.
Under Claiming Binding, for Days before claim fill in the number of days after the Expected date you want to go by before the system asks if you want to claim the late issue (claiming is letting the publisher or vendor know you did not receive that issue). Recommended days are: weeklies = 7; monthlies = 30; bi-monthlies = 45. For Unit of binding and Binding delay delete the default numbers and leave them blank.
Here is an example of a completed Card:
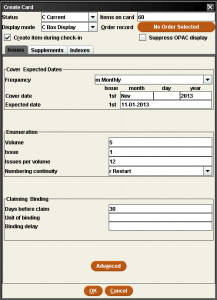
When you are done, double checkthe fields for accuracy, then click OK.
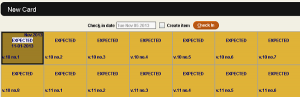
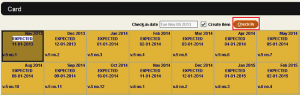
The card will open and you will see one box for each issue represented by the card:
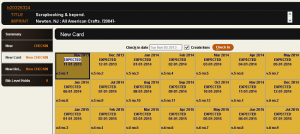
Notice the check mark in the box in front of Create Item; you need to make sure ths is checked so an item record is created when you check in an issue.
All the issues will be Expected, unless you are entering prior isses, in which case some will likely be labeled Late. You will also see in each box the cover date for that issue in the upper right corner, the Expected date and the volume and issue number.
Click Save to save your card. You will see New on the tabs replaced by a checkin card record number which starts with c.
Unusual Frequencies
Magazines that are published on a unusual schedule (7 or 15 times a year, for example) can be a challenge to create cards for. You can choose the Irregular frequency, and all the boxes will have blank cover dates; you can then edit each box as an issue arrives and add the date.
Another option is to choose the frequency that is closest to what you need, edit those boxes to reflect one year of the publishing schedule, then extrapolate that sequence for the number of years you want to have on the card.
Here are the steps to do that. We will use the example that a magazine is published 7 times a year, in Jan, Feb, March, Jun, Aug, Sept and Oct.
From the summary screen, click Attach New Checkin. Fill in the checkin card template as you normally would.
For items on card, fill in a number that most closely matches what you will need for boxes for one year. For this example, I am going to use 12 and choose the monthly frequency so I can just delete the boxes for the months I don’t need. If this magazine had cover dates of Jan/Feb, Mar/Apr, etc with an extra issue in July I would enter 6 and choose the bi-montly frequency, adding the one extra box I need.
Fill in the volume and issue numbers, the issues per volume and days before claim to fit your magazine.
Be sure to check the box for Create item during checkin.
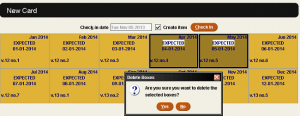
Click OK. Delete, Edit or Add boxes to reflect the actual publication schedule.
To delete boxes, highlight the boxes to delete and use the Delete key on your keyboard. You will be asked if you are sure; click Yes.
If you need to change the cover date or the volume or issue number for a box, double click on the box. The Modify Boxes Individually screen will open.
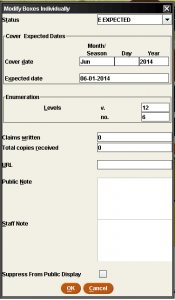
Make the needed changes, and click OK.
You can also right click on any box to get the edit menu; clicking on Box menu will allow you to choose what you need to do (Delete Boxes, Modify Boxes Individually).
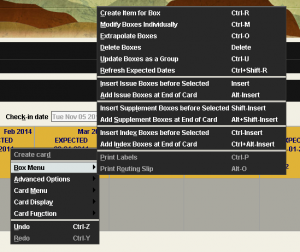
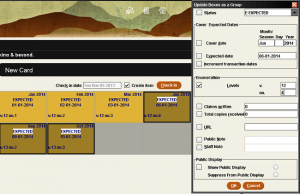
Now that you have the correct number of boxes with the correct cover dates, check the volume and issue numbers to make sure they are correct. With deleting and adding boxes the numbering will be out of order. You can either change each one individually, or update boxes as a group. To update boxes as a group, highlight the boxes that need to be changed, right click, and select Box Menu, Update Boxes as a group. The window will display the information for the first highlighted box; make the change needed to bring the numbering in line, and click OK. In this example, the June issue started as number 6, but is actually number 4, so that change was made.
Once you have the year of publication correct, it is time to extrapolate (duplicate) that schedule. Highlight all the boxes, right click, select Box Menu and Extrapolate Boxes:

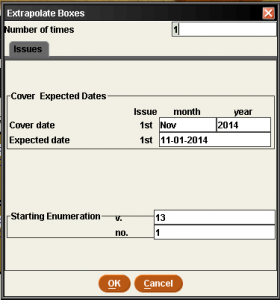
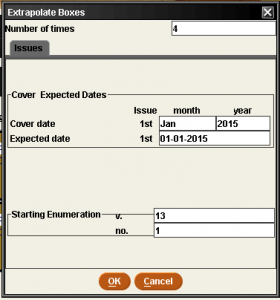
In the Extrapolate boxes window, enter the Number of time you want this schedule duplicated (this is NOT the number of boxes you want, but the number of years; enter 4 so that you have a total of 5 years of boxes). Check the Cover date; in this example it expects the next cover date to be November; this is not correct, so that is changed to January 2015. The expected date also needs to be changed; the shortcut of clicking in the box will not work here, you must type it in. Check the Starting Enumeration and correct if needed.
Before: After:
Click OK. You card will now have 5 years of correctly dated and numbered boxes.
If something goes wrong with the extrapolation that is not easily fixed, just close the record without saving and start over.
Checking in Issues
Whan a magazine issue arrives, check it in and create an item record for it.
Before starting, it will make your work easier if you have your Record View Properties for the Summary View set to Checkin. If your Retrieval View is set to Summary, then when you select your bib record, the card will open for you and you will be ready to checkin. From the View menu in the upper left of the Sierra screen, click Record View Properties. Make your selections.
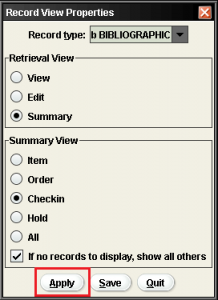
Click Apply; this will save these settings for the rest of this session only. When you are done, you can either log out and back in or change them back.
Clicking Save will make these settings the new default for your login.
Make sure you are in Function Serials Checkin.
Search for the correct bib record using the Magazines index. The record should open with your card open and boxes showing.
The Check-in date will show today’s date. The Create item box should be checked.
Highlight the box for the issue you are checking in. NOTE: it is very important you select the correct box; the item record is linked to the box it is created from and having an issue attached to the wrong box will cause problems.
Click Check In.
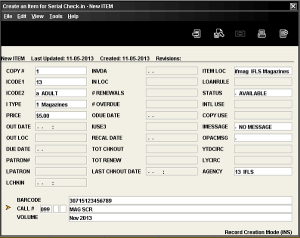
Item creation
Once Check In is clicked, the item template you have selected will open. Fill in the prompts as they come up. For the volume field, the volume number, issue number and cover date are already filled in. For a cleaner item record display it is recommended that you delete the volume and issue numbers here and just leave the cover date. The volume and issue numbers are important information and can be seen on the card display, but for patron ease-of-use having only the cover date in the item record volume field is preferred. When deleting these numbers be sure to delete the space after the issue number.
Click Save. A pop-up window will ask Save item record and card? Click Yes
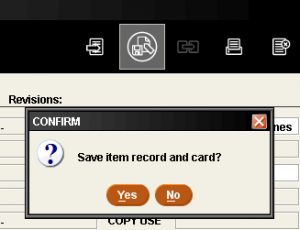
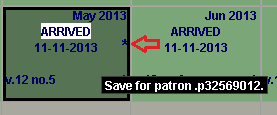
That box now says ARRIVED, with the checkin date underneath. The one in the lower right corner of the box indicates one copy.
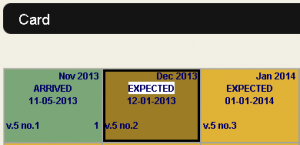
The next box is then highlighted, ready to be checked in. If you are done with this record, click close. The next time it is opened, the next expected issue will be highlighted, ready to be checked in.
Adding Notes
You can add a public note or a staff note to any box. To do this, double click on the box you want to add the note to and the Modify Boxes Individually window will open. On the bottom half of the screen there is an input box for Public Note and an input box for Staff Note.
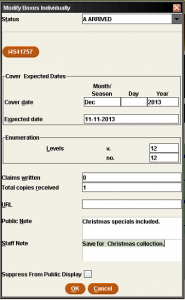
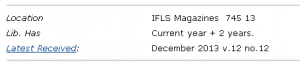
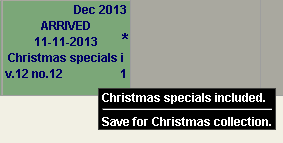
The public note displays in the catalog on the box display, seen when the “Latest Received” link is clicked from a checkin card.
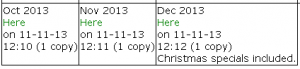
In Sierra, the first part of the public note displays in the box; the full note is shown when you hover over the box. The presence of a staff note is indicated by an asterisk (*) on the right side of the box near the date. You can see it by hovering over the box.
When done, click OK on the Modify screen, then click Save to make the changes permanent.